
")
By Sean Tinney November 3, 2025
Your Facebook lead just filled out your form. How long until they get your first email?
If the answer is “hours” or “when I download the CSV tomorrow,” you’re losing conversions. Speed matters—leads who receive immediate follow-up convert at dramatically higher rates than those who wait.
The manual process—downloading CSVs from Facebook Ads Manager, importing to your email platform, triggering your sequence—creates delays that kill conversions. Every hour between signup and first email drops your conversion likelihood.
AWeber’s direct Facebook Lead Ads integration eliminates that delay. Connect once, create automation rules that route leads from specific campaigns to specific email sequences, and your Facebook lead ads email notifications send automatically within 60 seconds of form submission. No manual downloads. No Zapier subscription. No delay.
Why Instant Follow-Up Matters
When someone fills out your Facebook form, they’re thinking about your offer right now. They expect confirmation or next steps.
Manual CSV downloads create three problems:
1. Conversion drops with delay.
Every hour between signup and first email reduces conversion likelihood. The longer the delay between someone expressing interest and receiving your first message, the lower your conversion rate.
2. Manual work introduces errors.
Downloading wrong CSVs, importing to wrong lists, forgetting tags, mapping fields incorrectly—all happen when managing imports manually.
3. Third-party costs add up.
Many businesses pay $20-$100+ monthly for Zapier to bridge Facebook and email platforms.
Direct integration eliminates all three.
How AWeber’s Facebook Lead Ads Integration Works
Here’s the complete technical flow:
- Someone submits your Facebook Lead Ad form
- Facebook sends that submission to AWeber via direct API connection (30-60 seconds)
- AWeber’s automation rule adds the subscriber to your designated list with specified tags
- Your Workflow detects the new tag and immediately triggers your Facebook lead ads email notification
- The lead receives your welcome email while still thinking about what they signed up for
The entire process runs hands-off after initial setup.
Setup: Connect Facebook to AWeber (5 Minutes)
Step 1: Connect Your Facebook Account
Navigate to Account (gear icon) → Integrations → Facebook Lead Ads → Connect.
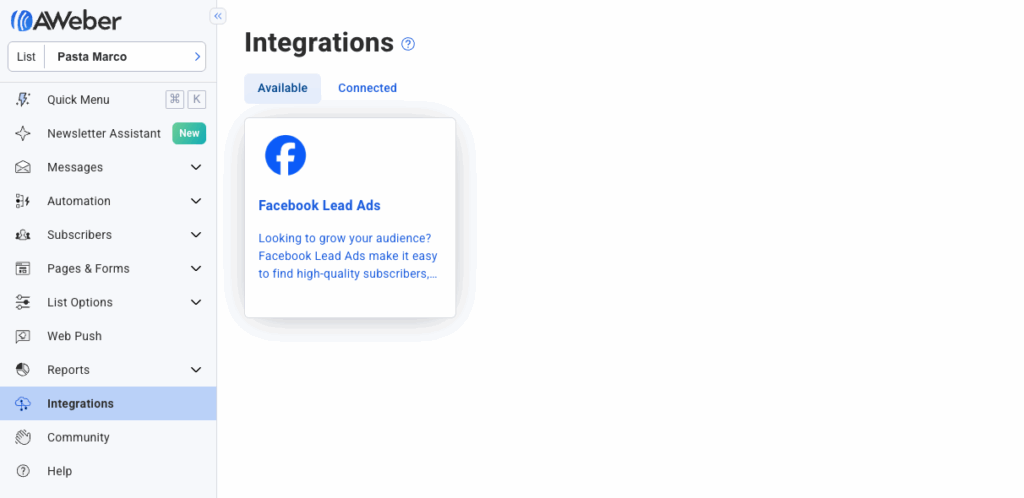
Log into Facebook and authorize AWeber to access your Lead Ads. This lets AWeber read form submissions—it can’t post on your behalf or access personal data.
Once authorized, you’ll see “Connected” status. This connection works for all your campaigns—you only connect once.
Step 2: Create Automation Rules
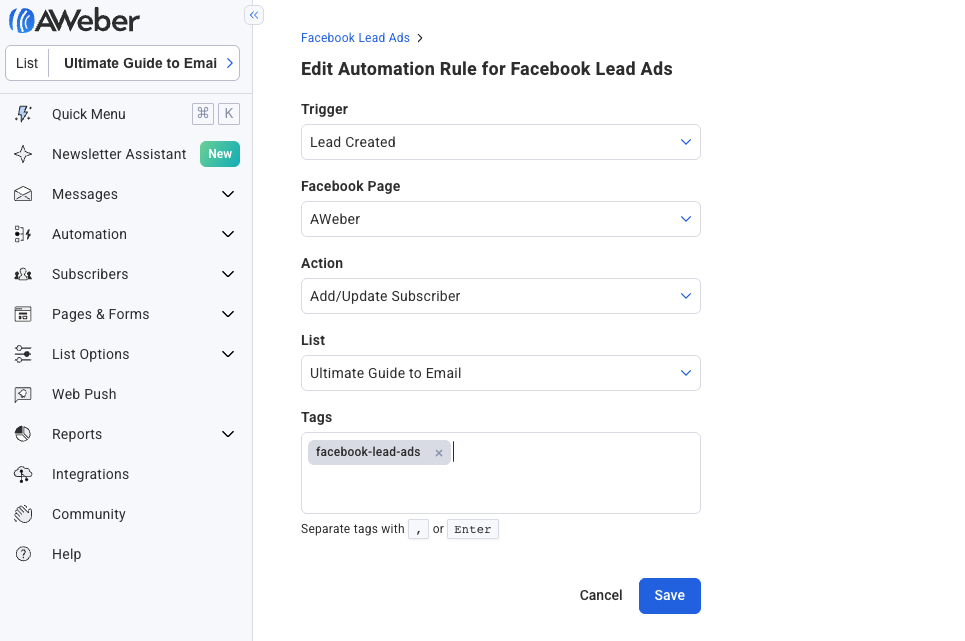
Click + Create Rule to route leads from specific Facebook campaigns to specific AWeber lists.
Configure four elements:
1. Trigger: Select which Facebook Lead Ad form triggers this rule. Running multiple campaigns? Create one rule per campaign so each routes correctly.
2. Action: Choose “Add Subscriber”.
3. List: Select which AWeber list receives these leads.
4. Tags: Add tags identifying the lead source (e.g., “FB-FreeGuide” or “FB-ProductDemo-Nov2025”). Tags let Workflows trigger specific email sequences based on campaign.
Step 3: Connect to a Workflow
Your automation rule adds leads with tags. Now create a Workflow to send emails.
1. Navigate to Automations → Workflows → Create Workflow →
2. Set trigger to “Only add subscribers who get a specific tag” → Add your Facebook tag (e.g., “FB-FreeGuide”).
Add your welcome email as the first step:
- Add a Step → Send a Message
- Wait time: 0 minutes (send immediately)
- Email content: Welcome email, lead magnet delivery, or confirmation
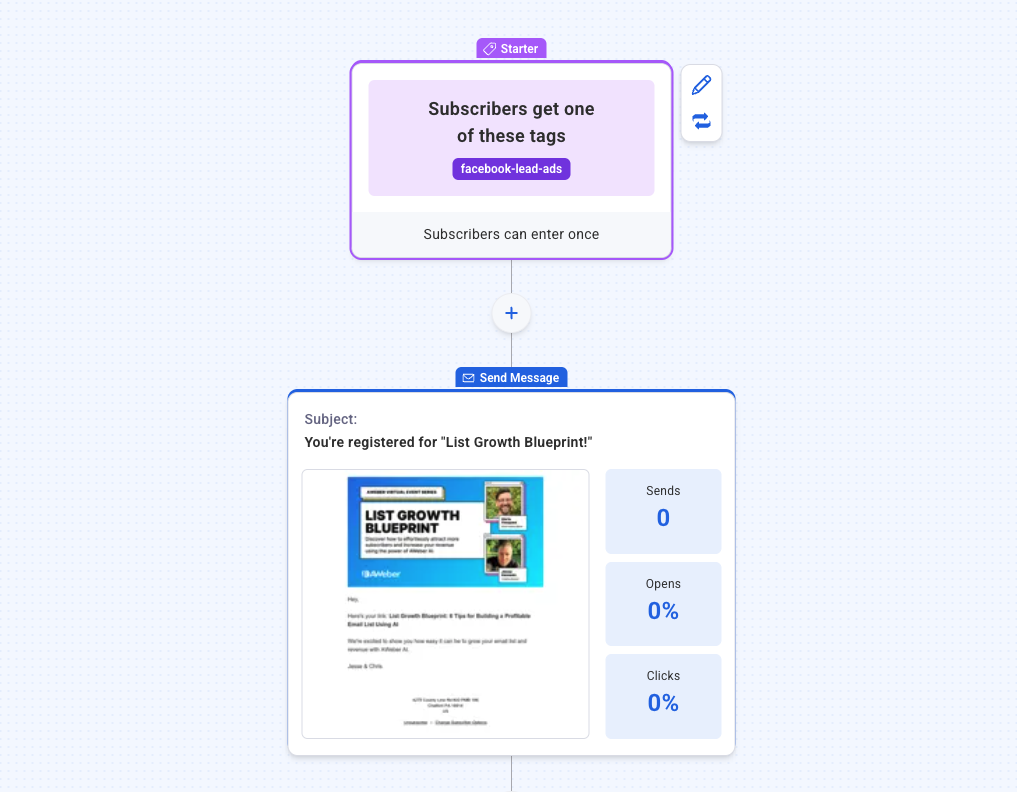
Now every lead from that Facebook campaign receives your email within 60 seconds of form submission.
Step 4: Test It
Submit a test lead through your Facebook form.
Check your email inbox within 60 seconds—you should receive your welcome email.
Verify the lead appears in your AWeber list with correct tags.
If everything works, your integration is live.
What Your First Email Should Include
Speed matters, but so does content. Your Facebook lead ads email notification should:
Confirm their action immediately. Acknowledge what they did: “Thanks for requesting the guide,” “Your demo is confirmed,” “Here’s your discount code.”
Deliver what they expected. If they signed up for a lead magnet, include the download link immediately. Don’t make them wait for a second email.
Set next steps. Tell them what happens next: “You’ll receive daily tips starting tomorrow,” “I’ll email you the day before our demo.”
Keep it focused. Your first email isn’t the place for your company story. Give them what they came for and set expectations.
Common Mistakes to Avoid
Adding delays to your first email. Leads expect immediate confirmation. Waiting 30 minutes doesn’t make you seem more human—it makes you seem slow.
Forgetting tags. Without tags, you can’t trigger campaign-specific sequences or measure which campaigns drive the best engagement.
Not testing before launching. Submit a test lead and verify everything works before spending money on ads. Finding errors after $500 in ad spend is expensive—finding them in a 30-second test is free.
Start Growing Your List With Instant Follow-Up
Ready to stop losing leads to slow follow-up?
Connect Facebook Lead Ads to AWeber and start converting more leads with instant email notifications.
Don’t have an AWeber account yet? Sign up today and get instant access to Facebook Lead Ads integration, Workflow automation, and all the tools you need to turn leads into customers.
Already using AWeber? Set up your first Facebook Lead Ads integration now—it takes 5 minutes.
Related Resources:
Facebook Lead Ads integration (Feature overview)
How do I integrate Facebook Lead Ads with AWeber? (Step-by-step guide)
Workflow Automation (Build email sequences)